Fudgies

  • 2 C sugar
  • 1/2 Cup OleoMargarine
  • 1/2 C milk
  • 3 T cocoa
  • 1/2 C peanut butter
  • 3 C rolled oats
  • 1/4 t salt
  • 1 t vanilla
  1. Put sugar, oleo, milk, cocoa in saucepan, bring to boil, boil 5 minutes.
  2. Remove from heat, melt in peanut butter, rolled oats, salt, vanilla.
  3. Drop by spoonsful onto wax paper.
  4. Cover, and cool in refrigerator.

Use Chili Peppers, and Hot Spices, Carefully

I love spicy foods. Now, compared to what you can get in Thailand, my food is not terribly spicy, but one Habanero pepper can pack a wallop. Even a jalapeno or serrano pepper can cause pain. Your mileage may vary here.

When I cook spicy foods, like Chuck's Kick In The Seat Of Your Pants Chili, or maybe Chuck's Memory Of Thailand Mango Salad (with fresh jalapeno peppers), I take precautions. If you are going to use my recipes, I advise the same, based upon experience. The hot peppers (Habanero), and spices (Cayenne), can cause burning - seriously - if you're not careful. I like to joke around - a lot - but I am not joking here.

  • When you clean and chop raw peppers, don't put your face in line with what you're chopping or cleaning. A squirt of juice or a seed from a jalapeno, in your face or your eye, will interrupt your cooking activities for more time than it takes to clean and chop it carefully.

  • When you're cooking something with spicy vegetables, or hot spices in general, and you take the lid off the pan, use common sense. Don't stick your face into the fumes. Take the lid off with the opening pointing away from your face.

  • If any discomfort is felt in eyes, stop immediately what you're doing, and flush eyes with water. Never rub eyes with hands until following morning.

  • Wearing contact lenses may make your eyes especially sensitive to the fumes given off by the spices / hot peppers as they cook. Beware.

  • Wash hands thoroughly, under running water, after preparing chili peppers. I use a kitchen brush with plenty of detergent, and scrub each finger on both hands, and under the fingernails. Plan on 5 minutes of scrubbing.


If you ignore my advice, you'll find out one day what I'm talking about. Or you can laugh at me for being a wimp. Your choice.

Perfect Meatloaf


  • 1/2 C catsup
  • 4 T brown sugar
  • 4 t vinegar
  • 2 t vegetable oil
  • 1 med onion, chopped
  • 2 cloves garlic, minced
  • 2 lg eggs
  • 1/2 t black pepper
  • 1 t salt
  • 1/2 t dried thyme
  • 2 t Dijon mustard
  • 1/4 t hot sauce
  • 2 t Worcestershire sauce
  • 1/2 C milk
  • 1 lb ground chuck
  • 1/2 lb ground pork
  • 1/2 lb ground veal
  • 2/3 C saltine crackers, crushed (16 or so)
  • 1/3 C minced parsley


  1. Mix the glaze: catsup, brown sugar, and vinegar. Set aside.
  2. Heat oven to 350.
  3. Heat oil in skillet or pan on medium.
  4. Add onion and garlic, saute until softened, about 5 min.
  5. Set pan aside to cool.
  6. Mix eggs with pepper, salt, thyme, mustard, hot sauce, Worcestershire sauce, and milk.
  7. Add egg mixture to meat in a large bowl, with crackers, parsley, and cooked onion and garlic.
  8. Mix well with fork, until evenly blended, and mixture doesn't stick to the bowl. If it continues to stick, add a little milk.
  9. Starting with wet hands, mold mixture into a loaf shape, about 9" x 5".
  10. Place mixture in a foil lined pan, brush with half the glaze.
  11. Bake until crisp, about an hour at 350.
  12. Let cool 1/2 hour or so, then brush the remaining glaze over top, and serve.

Microwave Popcorn

Yes, this really works.

  • 1 #6 paper sack (sandwich bag)
  • 1/4 C popcorn


  1. Take an ordinary lunch bag (#6 paper sack).
  2. Pour in popcorn.
  3. Fold the bag shut - I folded the top down 1", tightly creased, and the same again.
  4. Put the bag on its side in the microwave oven, with the top fold down (hot air rises presumably).
  5. Microwave on high for a total of 1:45 minutes. Here's where you have to experiment. I tried 2:30 the second time, and that was way too long. I have a 1100 watt oven - yours may vary. I do 1 minute, turn the bag over, shake well to spread the upopped kernels evenly on the bottom of the bag, then finish with the remaining :45 or so.
  6. If it starts to smell badly burned, stop the oven, then back off 5 - 10 seconds the next time. Give it a few seconds to finish popping after you stop the oven - if it stopped popping before you stopped the oven, then back off 5 - 10 seconds next time. There will always be some slight burning, if you're going to pop most of the kernels.
  7. Open the top of the bag carefully - a little steam may be left.
  8. Pour the contents into a 2 quart bowl.
  9. Enjoy.

Black Bean Soup

Black Bean Soup, if you make it from dried beans, takes some planning (start the night before serving). But it's worth the time it takes. Garnished with a little salsa and sour cream. Yumm.
  • 1 C dried black beans
  • water, lots of it
  • 1 lg clove garlic, minced
  • 1 jalapeno pepper, minced
  • 1 small onion, diced
  • 1 rib celery, diced
  • 1 carrot, diced
  • 2 bouillon cubes
  • 1/4 t black pepper
  • 1/4 t cumin
  • 1/4 t cayenne pepper
  • 1/4 t Italian spice

  1. Soak beans overnight in water - start mid evening - 12 hours is good. A clear 2 Quart Pyrex utility bowl is perfect for this task - you can look thru the sides for debris. And the sides are marked for measuring.
    • Pour beans into bowl.
    • Cover with water, 1 inch over top of beans.
    • Let it sit for a couple hours.
    • Pick floating debris out of water.
    • Drain, rinse, repeat this til bedtime.

  2. Cover bowl, and put in refrigerator. I'm told undried beans sitting out overnight will ferment.
  3. The next day, drain and rinse one last time, cover with water, 3 inches over top of beans. Add bouillon cubes.
  4. Bring to boil, and simmer 1 1/2 hours.
      In microwave:
    • Cook on High (100%) 10 minutes.
    • Cook on Low (30%) for 90 minutes.

  5. Add other ingredients.
  6. Add enough water to 7 cups in the bowl.
  7. Bring to boil again, and simmer 1 1/2 hours.
      In microwave:
    • Cook on High (100%) 5 minutes.
    • Cook on Low (30%) for a second 90 minutes. Get the beans nice and tender.

  8. Add enough water, again, to 6 cups in the bowl.
  9. Serve hot, over rice. Or let it sit in refrigerator until cool.

Slicing a Mango

A mango is a pretty odd fruit. I remember the first time I was given one, to eat. It's huge, and juicy sweet. But you have to get thru the skin, which is tough, and not too tasty. Once you do that, you get a couple bites of sweetness, then you end biting into this huge rock that wrecks your teeth. OUCH.

WTF?

So what use is it?

Well, you'll find several websites telling you how to peel, and slice, a mango. But the ones I found provided only the basic information. Once you actually try it, it's a guessing game, and you're on your own. So, I made my own instructions.

First, make sure the mangoes are nice and ripe. Typically, you will want to ripen them for several days, or even a week or more.

When you get them at the store, they're probably hard as a rock. Make sure all the ones you buy are equally hard, so they will all ripen at the same time.

Bring them home from the store and put them in a brown paper bag, one about twice the volume of the mangoes. Roll the end up nice and tightly, and set the bag aside for a few days. When they're ripe, you should be able to poke them gently, and feel your finger leave about a 1/4" depression. Too ripe is better than not ripe.

Now that they're ripe, take a look at one first, while it is whole.

  • Put the mango on a plate. Let it lie there naturally, with the stem end to your left, and the tip end to your right.
  • Look at the mango, from above. See the oval shape, with the stem at one end? What you're looking at is a half inch or so of juicy sweet fruit, surrounding a huge seed. The seed is oval too, and roughly the shape of the outer fruit. Remember this shape.
  • Look at the mango, from either end. You'll see that it is not round, in crossection - it's more of a flattened oval. That's the shape of the seed too. Remember this shape.
  • Soak the mango in some nice anti-bacterial dish washing detergent. Just like soaking dishes - a drop or two of detergent, fill a container with water, get a good head of foam, and drop the mango in there. Let it soak for an hour or so, take it out and rinse thoroughly.
  • Take a plain potato peeler, and peel the skin off the mango, just like off a potato. This will be a sticky job, so organise as much as possible. Get all the needed tools out and on the counter before you start, and plan on ending up with your hands covered in mango juice.
  • Take a freshly peeled mango, and put it in the palm of your hand, with the stem end towards your wrist, so it's flat in your hand (remember looking at the flat shape from above, in the step above?).
  • Take a nice sharp utility knife, and cut thru the flat side of the mango, in the middle, towards the palm of your hand. Don't worry - you will NOT cut thru the seed - your hand is safe. Do this in two or three places up and down the flat side. This should give you an idea how deep the seed is. In most cases, you'll get maybe 1/4 way thru one side before hitting the seed.
  • Now that you know where the seed is, you know how deep to cut into the mango. Start at the end opposite the stem (remember looking at the mango from above, in the step above?), and cut towards the stem, and parallel to the wide flat side of the seed. Just run the knife down the flat side of the seed, to the stem end. You now have 1 piece of mango, oval, maybe 1/2" deep, the size of one side.
  • Turn the mango over, and repeat.
  • Next, cut a couple narrow strips of fruit off the sides of the seed.
  • Put the 4 pieces in a bowl, and the seed in another bowl. Next, peel and slice another, in the same way. Don't just throw the seeds away.

When you finish peeling and slicing each mango, go outside with the bowl of seeds. There will be plenty of fruit sticking to the seeds, that you will never get with a knife, but you can with your teeth. Just don't try inside your house, cause this is messy. Think sucking the cherry or plum off the seed, except you won't be able to get your mouth closed with the seed in it. So you'll have mango juice everywhere, which is why I said
Don't try this inside the house.

But the sweetest part of the mango is next to the seed.

Now, my instructions are for those folks who live in the USA, where mangoes might be on sale for 50c each, if you're lucky; in some cases you could pay up to $2.00 each. In Australia or Thailand, where they sell for maybe 10c each, my bud Bob provides this picture tutorial ThaiPan: One way to Prepare a Mango. He's a bit more casual with the knife, and with the precious fruit.

>> Top
Don't Throw Out The Leftovers

I know everybody who's been cooking for a while has probably knows this already, so my apology for boring you. You folks who are just starting out need to know this though.

When you cook a vegetable, broccoli or cauliflower for instance, you trim the vegetable. You'll use the main portion of the vegetable for your main dishes, to keep the cooking consistent, and make the recipe manageable. But 75% of what you don't use in the main recipe can, and should, be saved for later.

With potato leek soup, for instance, you put maybe 60% of the leek into the soup. Now I don't know of any use for the hairy root, so that goes in the trash. But the green part of the leek is perfect, chopped, as a garnish for Peanut Stew, or well chopped and raw, in Couscous Salad, or Taboulli.

And when you cook broccoli or cauliflower, you'll serve the flowery end of the broccoli or cauliflower first. But take the stalk, put it in an airtight refrigerator dish, and save it for a few days. When you need a quick meal, take the stalk, peel it lightly (remove the outer edge, the toughest knots where the various branches split from the stalk, and cut off the end which may have gotten a bit tough from the air), and slice it crossways into 1/4" thick medallions. A little lemon juice, cumin, and / or garlic makes that pretty good, microwaved til tender. Or put the slices into Peanut Stew.

Those of you with crock pots probably put everything into a stew, on principle. OK, my apologies for boring you here. The rest of us can learn other tricks though.

Potato Leek Soup

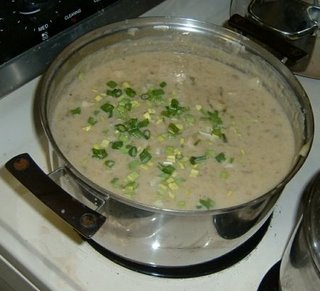
Potato Leek Soup is wonderful during cold weather, served hot, or during hot weather, served chilled. A bit of San Francisco sourdough bread is a perfect accompaniment. A simpler version of this recipe, that takes a lot less work, is Potato Soup.


  • 3 T olive oil
  • 4 cloves garlic, crushed
  • 1/2 bunch cilantro leaves, minced (opt)
  • 1/2 t dillweed
  • 1/2 t marjoram
  • 1/2 t rosemary
  • 1 bunch green onion, diced
  • 1 med yellow onion, diced
  • 2 leeks, well cleaned and diced
  • 3 lb potatoes (9 - 12 medium potatoes), well washed, scrubbed, and diced 1/2" cubes
  • 4 C chicken or vegetable broth (4 boullion cubes + 4 C boiling water)
  • 4 C milk (1 can evaporated milk + 3 C water)
  • 2/3 C oatmeal
  • ground pepper, nutmeg, diced green onions for garnish
  1. Heat dutch oven (large dutch oven is best) to medium temperature, add olive oil, add cilantro and garlic, crumble dried spices into pan. Saute a few seconds, stir briskly.
  2. Add half of the green onion, saute 30 seconds or so, stir briskly. Reserve other half for garnish.
  3. Add yellow onion, saute a couple minutes.
  4. Add leeks, cook 5 min or so, stir frequently.
  5. Add oatmeal, stir a couple minutes to brown it.
  6. Add potatoes, stir a few minutes to brown them.
  7. Add broth and milk, stir, bring up heat to simmer, turn down to slow simmer.
  8. Cook 30 - 45 minutes, until vegetables are tender and soup thickens. Make sure potatoes are very soft. Longer is better.
  9. Garnish with ground pepper, nutmeg, and reserved chopped green onions.
  10. Serve immediately, if you're hungry. Best flavour may be obtained from refrigerating overnight, but take precautions, if you do this.
Clean The Leeks Well Leeks are a root vegetable like green onions. Unlike the green onion, they gather a lot of dirt inside the root. You must clean them very thoroughly. Nothing kills good soup more than gritty taste (however well cooked). Google for "leeks laxative", if you don't understand the consequences.
  • Trim the root (hairy end), and trim the top, keeping an inch or so of the green leafy leek. Save the remainder for other soups, or cooking in general.
  • Slice the leek lengthwise, in half.
  • Hold the half in your hand so it doesn't separate, agitate in a large pan of water for a good 30 seconds to wash all dirt out of the root. Don't be in a hurry here, clean well. Repeat for each half.
  • Drain the pan. Wash all dirt out of the pan, refill with water, and repeat cleaning until the pan drains totally clean.
  • Let the leek halves drain well, slice as thin as you can vertically, then chop horizontally.
If Prepared The Previous Night With most soups and stews, and this recipe is no exception, the flavour is intensified from sitting overnight, in a well sealed refrigerator container, after cooking. But be prepared. The oatmeal in this recipe will continue to soak up fluids, even when refrigerated. So if you prepare potato leek soup, and plan to serve it the next day, have a couple extra bouillon cubes ready. Make a couple cups extra broth, before warming the soup for serving. If the soup has turned into stew, or aspic even, warm it slowly and add 1/2 cup of broth, or even more, until it becomes a soup again. The flavour will be perfect, and the consistency will make the extra effort worthwhile. The Leftover Portion Of The Leek Do not throw out the green leafy portion of the leek - it's all good. It makes an perfect substitute for onion in any recipe. Properly diced, it works quite well in Couscous Salad, or Tabouilli, for instance.

Peanut Blossoms

4 cups sugar
16 tbsp. milk
4 cups brown sugar
4 tsp. vanilla
4 cups shortening
14 cups flour
8 eggs
4 tsp. soda
4 cups peanut butter
4 tsp. salt

Shape dough into balls. Roll in sugar and bake on ungreased cookie
sheet at 375 F. for 10-12 minutes. Immediately top each cookie with a
Hershey's kiss or star pressing down firmly to crack cookie. Makes a
heck of a lot.

Marshmallow Fudge

1/4 C butter / margarine
13 oz (1 can) evaporated milk
1/4 t salt
1 1/2 C sugar
12 oz chocolate chips
3 C miniature / 24 full size marshmallows
1 C chopped nuts - pecans / walnuts
1 t vanilla

  • Combine butter, milk, salt, and sugar in a 3 quart casserole or mixing bowl. Loosely cover with lid or plastic wrap.
  • Microwave on High (100%) for 3 to 4 minutes, or until boiling. Uncover.
  • Microwave on High (100%) for 12 to 20 minutes (depending upon power of oven), testing every 2 or 3 minutes, looking for soft ball stage.
  • When soft ball stage is reached, stir in additional ingredients, until cholcolate and marshmallows melts evenly.
  • Pour mixture into a well greased baking dish, 12" x 7' x 2" size or thereabouts.
  • Cover with plastic wrap and refrigerate several hours (at least) or overnight (best results).