The Making Of 200 Stuffed Mushrooms

Day 0 - Involvement
All I wanted to do is prove that men can cook too, so I volunteered to work on preparations for the party.

"What can I bring?" I asked. Sue looked at her list.

"How about stuffed mushrooms?".

Well, I've made stuffed mushrooms a few times, and never been too impressed. But they are easy enough to make - just snap the stems off, chop up the stems, add a few veggies and spices, stuff the mixture into the empty (stems removed) caps, and bake. An easy project.

"Sounds good to me. How many shall I bring? A couple dozen or so?".

"Well, we're planning on 50 people. Better make it a few more. Say 200."

Whoops.

Well, I'm not one to back down, so I thought why not? And the fun began.

Day 1 - Purchase and Preparation
So how do you get 200 mushrooms? That's a lot of mushrooms. Thanks to Lois, also in the party planning committee, I found my way to Lunardi's Grocery in Walnut Creek.

Inside I went, to the vegetable department, and found a grocery clerk. And 10 minutes later, I left the store with a 10 pound case of fresh mushrooms.

Did I say this already? That's a lot of mushrooms.

First, came the task of cleaning. Well, the largest container that I have, that was suited for this task, was a salad spinner. Which held a couple pounds at a time. And I quickly developed a routine, born of necessity.

  • Half fill the empty salad spinner with dirty (and boy were they) mushrooms.
  • Fill with water, agitate til water turns brown.
  • Drain mushrooms from salad spinner.
  • Replace slightly clean mushrooms in salad spinner, and repeat process.
  • As each quantity of mushrooms became so clean that the water drained off them was clear, agitate the drainer well to ensure that all of the water drained off them, then dump the clean mushrooms into a Tupperware container.
  • Repeat the above process, with another 2 pounds or so.

Once I had filled 3 large Tupperware containers with nice clean, dry mushrooms, I sealed the containers, put them in the refrigerator, and called it a day.


BEFORE


  • Empty mushroom caps.
  • Mushroom stems.
  • Bread crumbs.
  • Leftover mushrooms (my patience ran thin after 200).
  • Chopped veggies.


Day 2 - Cooking
The second day started with my realisation that my old recipe - One Dozen Easy Stuffed Mushrooms - was nowhere to be found. The reason why I started this blog, in the first place, was that I had grown tired of my recipe box - which was an index card holder stuffed full of documents that were not all on index cards. Looking it up on the web is so much easier, and more fun.

So back to the web I went, and, from a Gohoo of:

recipe stuffed mushrooms garlic onion cheese

I rounded up half a dozen or so interesting recipes. From the recipes, I observed:

  • Proper proportions.
  • Additional ingredients.
  • Cooking techniques.

The issue of cooking techniques, in particular, was quite enlightening. I learned to (DOHH) cook the spices / stems / veggies mixture BEFORE adding it to the bread / cheese, and stuffing the mushrooms. So that's why the ones I made always fell apart, and why the veggies were always so hard when the mushrooms were eaten.

The idea of letting the mushrooms cook until the pan was full of water was, likewise, a new idea to me. Previously, I had thought that shrunken, watery mushrooms meant that they had been cooked for too long, and at too high a heat. So my previous attempts would end up with semi-cooked, yet leathery, mushrooms.

The whole Internet experience was well worth the time. Obviously, you already know that, cause you're here. Unless you're here for the laughs, in which case welcome to Chuck's Kitchen. And, if you're ever in the Martinez area, and feel the need for spiritual refreshment, you could do a lot worse than dropping by Martinez UMC, which is where this story started.
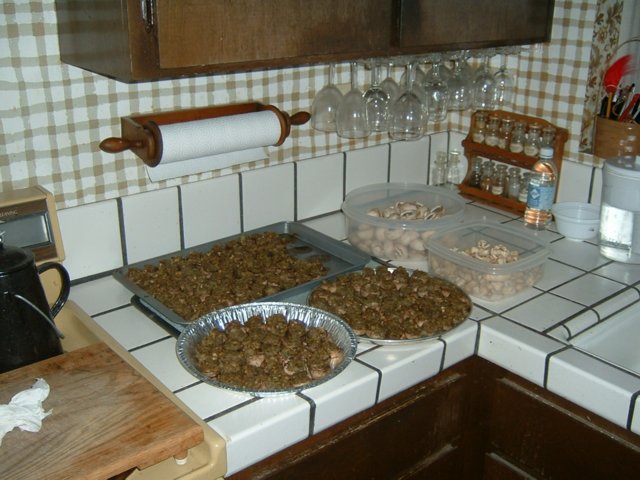

AFTER


  • 3 pans of cooked and drained stuffed mushrooms (some taste testing was done, you will count MAYBE 150 I dunno).
  • Leftover caps.
  • Leftover stems.

I didn't buy enough bread, and ran out of crumbs, after stuffing 175 or so, so I had a few mushrooms left over. The leftovers were cooked the following week, when I wrote my second recipe using normal quantities.

Stuffed Mushrooms - Normal Recipe

This recipe uses much more maneagable portions of ingredients - and should be much easier to cook.

2 Lbs mushrooms, properly chosen and cleaned - 40 or 50
8 oz bread, crumbed
1/2 C finely chopped onion
1/2 C finely chopped celery
1/2 t green spices - marjoram, oregano, tarragon, thyme
2 cloves garlic
1/2 C powdered cheese - Parmesan or Romano
1 T olive oil

Buy a 16 oz loaf of bread - I used sourdough (Northern Californian specialty) several days ahead of time, cut the loaf in half, and preserve one half for normal eating. Take the other half, cut or break into slices or chunks, and let it dry out, in an oven if necessary. Turn them into crumbs, in a food processor. Dry crumbs are best - they get moistened later.

Remove the stem from each mushroom. This is where large, slightly stale mushrooms are best. Set the caps and stems aside.

Peel and finely chop the garlic - in a food processor. Remove the garlic from the food processor, and set aside.

Chop the mushroom stems in the food processor, into crumbs, next.

Chop the bread into crumbs, as finely as possible, in the food processor, last. The hard bread crumbs help scrub the mushroom and garlic off the food processor container. Mix the cheese into the crumbs while processing. Combine the bread crumbs and cheese thoroughly, and set aside.

Heat up a Dutch Oven until water droplets sizzle when dropped in. Add Olive Oil. Add garlic, saute very briefly. Crumble the spices (crush them with your fingers) into the garlic, add onions and celery, mix well and saute until onions are transparent and slightly soft. Add chopped mushrooms, mix well and saute until they start to give off water. Turn off the heat, and let the veggies cool a bit.

Add the cooked veggies to the bread crumb and cheese, mix well. The bread / veggies will turn into a thick ghooey paste - which is good. You want a pasty mixture so it will stick inside the mushroom caps.

Preheat the oven to 400F. Start stuffing the mushroom caps. I found it works best to just scoop up a teaspoon or so of stuffing, turn the spoon over and gently pack the stuffing into the cap. Scrape the spoon in both directions for an attractive, mounded effect. Just pack the stuffing in slightly, and put on a baking sheet. Mushrooms are not like cookies - you do not have to leave expansion room - they will shrink as they cook.

Fill up one baking sheet, stick it in the (by now) heated oven. Let it cook 15 - 30 minutes, until the stuffing is brown on the top, the mushrooms are giving off water, and they have shrunk. Take the sheet out of the oven, and use a spoon to pick up and transfer the cooked mushrooms to another, dry sheet. Set the sheet aside to cool. Stick the next sheet into the oven, and repeat. Pack the mushrooms tightly on the cooking sheet.

Cover each sheet of cooked, repacked, and cooled mushrooms with aluminum foil, airtight, and refrigerate. Refrigerated, and slightly hardened, mushrooms travel better, and tightly packed mushrooms have less air surface, and will slide around less, so get less damage when traveling.

Just before serving, sprinkle the tops with just a bit of cheese, and broil for 5 - 10 minutes until the added cheese browns just slightly.

Stuffed Mushrooms - 200 Of Them

Yeah, this recipe is for 200 of them. Here is another recipe, for a slightly less ambitious amount. And here is an account of my attempt, which lead to this recipe.

10 POUNDS mushrooms, properly chosen and cleaned
2 POUNDS bread, crumbed
2 C finely chopped onion
2 C finely chopped celery
1/2 C green spices - marjoram, oregano, tarragon, thyme
1 HEAD garlic
1 C powdered cheese - Parmesan or Romano
1/4 CUP olive oil
Lots of time
Full size food processor
2 or 3 large mixing bowls
4 11 x 18 inch cookie baking sheets

This is not an afternoons project - plan on at least 2 days of intensive work.

Buy 2 16 oz loaves of bread - I used sourdough (Northern Californian specialty) several days ahead of time, and let them dry out. Cut or tear into chunks, dry in oven if necessary. Turn them into crumbs, in a food processor. Dry crumbs are best - they get moistened later.

Remove the stem from each mushroom. This is where large, slightly stale mushrooms are best. Set the caps and stems aside.

Peel and finely chop the garlic - in a food processor. Remove the garlic from the food processor, and set aside.

Chop the mushroom stems in the food processor, into crumbs, next.

Chop the bread into crumbs, as finely as possible, in the food processor, last. The hard bread crumbs help scrub the mushroom and garlic off the food processor container. Mix the cheese into the crumbs while processing. 32 ounces of bread will be several batches, unless you have a pretty large food processor (I didn't). Combine the bread crumbs and cheese thoroughly, and set aside.

Heat up a Dutch Oven until water droplets sizzle when dropped in. Add Olive Oil. Add garlic, saute briefly. Crumble the spices (crush them with your fingers) into the garlic, add onions and celery, mix well and saute until onions are transparent and slightly soft. Add chopped mushrooms, mix well and saute until they start to give off water - and stems from 10 pounds of mushrooms will be a lot of water. Turn off the heat, and let the veggies cool a bit.

Add the cooked veggies to the bread crumb and cheese, mix well. Now you'll need a pretty large mixing bowl. The bread / veggies will turn into a thick ghooey paste - which is good. You want a pasty mixture so it will stick inside the mushroom caps.

Preheat the oven to 400F. Start stuffing the mushroom caps. I found it works best to just scoop up a teaspoon or so of stuffing, turn the spoon over and gently pack the stuffing into the cap. Scrape the spoon in both directions for an attractive, mounded effect. Just pack the stuffing in slightly, and put on a baking sheet. Mushrooms are not like cookies - you do not have to leave expansion room - they will shrink as they cook.

Fill up one baking sheet, stick it in the (by now) heated oven. Let it cook 15 - 30 minutes, until the stuffing is brown on the top, the mushrooms are giving off water, and they have shrunk. Take the sheet out of the oven, and use a spoon to pick up and transfer the cooked mushrooms to another, dry sheet. Set the sheet aside to cool. Stick the next sheet into the oven, and repeat. Pack the mushrooms tightly on the cooking sheet.

Cover each sheet of cooked, repacked, and cooled mushrooms with aluminum foil, airtight, and refrigerate. Refrigerated, and slightly hardened, mushrooms travel better, and tightly packed mushrooms have less air surface, and will slide around less, so get less damage when traveling.

Just before serving, sprinkle the tops with just a bit of cheese, and broil for 5 - 10 minutes until the added cheese browns just slightly.

Choosing and Cleaning The Mushrooms

When you're normally buying mushrooms for simple cooking, you probably look for small (1" or less in diameter), very fresh ones, and with very short stems. Believe me, when you're stuffing mushrooms, these will NOT be your favourite ones.

For stuffing, you will want large (2" or so in diameter), slightly stale ones, with long stems (1/2" or so). See below to understand why.

Having chosen 10 pounds of mushrooms, prepare to spend some time cleaning them. Those 10 pounds will not be all vegetable - some will be dirt, and THAT won't taste too good. You'll want to make several passes - fill a large container with water, dunk and agitate mushrooms, and drain. And repeat, until the drained water is clean. If the largest container you have is not at least twice as large as the volume of mushrooms being cleaned, you'll have to do it in batches. Clean the mushrooms well.

Having cleaned the mushrooms, let them drain really well. Then cover, in airtight containers, and refrigerate them overnight for best results.

Properly chosen, and cleaned, mushrooms will be much easier to prepare.

  • To remove the stem, you need to grab and rock / twist it, so a longer stem gives you something to grab.
  • With the mushroom slightly stale (and the stem starting to separate from the cap), the stem will just pop out of the cap, leaving you a nice hole to fill with the stuffing.
  • If the stem doesn't pop off, you'll have to scoop it out with a spoon - and try scooping the stem out of a 1/2" mushroom, without breaking it.
  • With 150 - 200 mushrooms to remove stems from, using a spoon will not be a favourite activity.

Automate the cleaning and preparation, and you can be done in a couple hours. Don't automate, and you could take all day. It's your dime.